
I’m sure makeup brushes play an important role behind each of your immensely favorite makeup looks.. But have you ever cleaned them properly?
Dirty makeup brushes can accumulate bacteria, oils, and leftover makeup, which may lead to skin irritation, breakouts, or even infections. Keeping your brushes clean is not just a matter of hygiene—it’s a responsibility to your skin’s health. Regular and proper cleaning of makeup brushes not only extends their lifespan but also protects your skin by preventing bacterial buildup. Moreover, clean brushes ensure smoother application and improve the overall quality of your makeup.
This guide walks through how often you should wash your brushes, an easy step‑by‑step cleaning routine you can follow at home, the safest ways to dry them, and simple habits to keep your tools in top condition.
How Often Should You Clean Makeup Brushes?
Different brushes and routines require different cleaning schedules, but one rule always applies: the closer a brush is to cream, liquid products, and your skin, the more often it needs to be washed.
- Face brushes (foundation, concealer, cream contour, beauty sponges)
Aim to clean them after every use or at least two to three times per week, especially if you have oily or acne‑prone skin. - Eye brushes (eyeshadow, blending, eyeliner)
For everyday makeup, washing them once or twice a week is usually enough; if you wear heavy eye looks or have sensitive eyes, clean them more frequently. - Lip and brow brushes
These pick up highly pigmented and waxy formulas, so rinse or spot‑clean after one to three uses to avoid staining and product buildup. - Occasionally used or backup brushes
Even if they sit untouched, give them a thorough wash every month to remove dust and keep them fresh.
You can create a simple “brush cleaning calendar”, like choosing one evening each week as your regular deep‑cleaning session, so buildup never gets out of control.
👉 For a full breakdown by brush type and skin type, read our guide on how often to clean makeup brushes.
What You Need to Clean Makeup Brushes?
You don’t need a professional setup to clean your brushes properly. A few basic tools make the process easier and more effective.
- Lukewarm water – hot water can damage bristles and loosen the glue inside the ferrule.
- Gentle cleanser – a dedicated makeup brush cleaner, mild shampoo, or gentle face wash all work well.
- Small bowl or cleaning mat – helps create lather and remove product from the bristles.
- Clean towel or paper towel – for blotting out excess water and reshaping the brush.
- Drying aid – a brush drying rack, hanger, or any setup that lets brushes dry with the bristles angled downward.
For very dirty foundation or cream product brushes, keep a slightly stronger degreasing option (like a drop of dish soap mixed with a mild cleanser) for occasional use.
Step‑by‑Step: How to Clean Makeup Brushes
This simple routine works for most synthetic and natural‑hair brushes you use on your face and eyes.
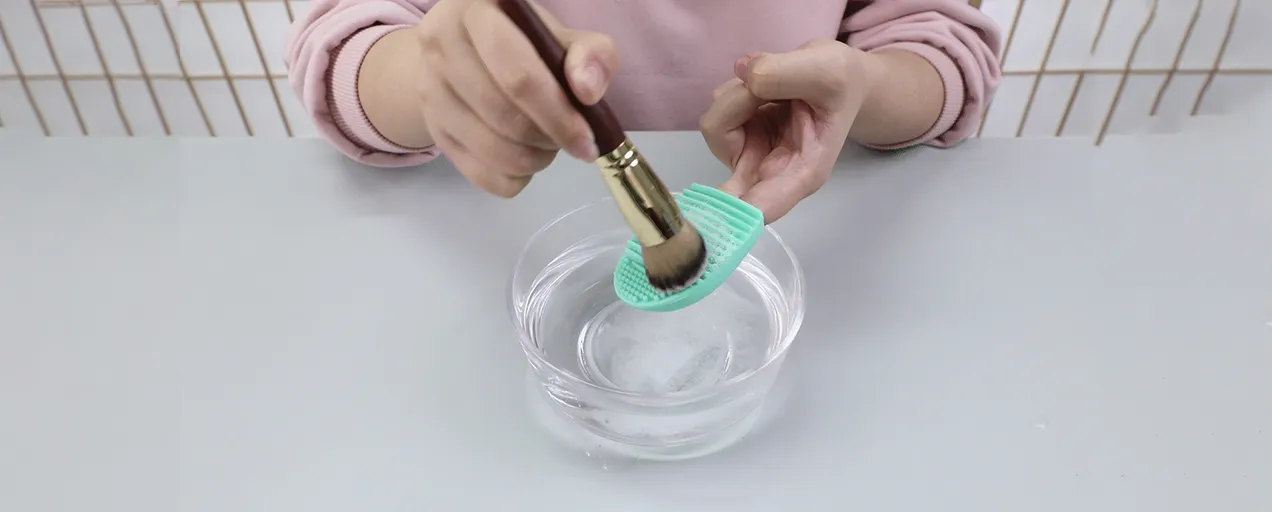
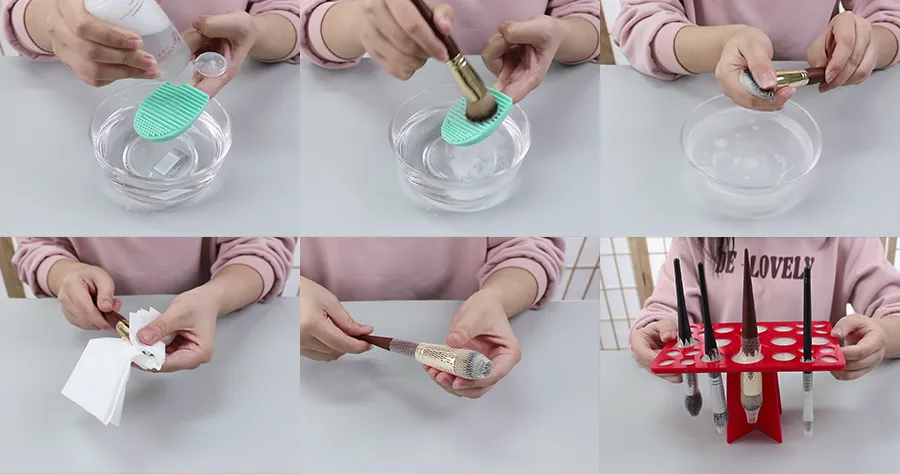
Step 1: Wet the bristles
Hold the brush with the bristles pointing down and run just the tips under lukewarm water. Avoid soaking the metal ferrule or handle, as water can seep inside and weaken the glue.
Step 2: Add cleanser
Place a small amount of your chosen cleanser into your palm, a bowl, or onto a textured cleaning mat. Use only as much as you need for a light lather.
Step 3: Gently swirl and massage
Swirl the wet bristles in the cleanser using gentle circular motions. Massage the brush until you see makeup and residue lift away and the lather turns slightly cloudy. Avoid pressing too hard or bending the bristles sharply.
Step 4: Rinse thoroughly
Rinse the bristles under lukewarm running water, always with the brush head pointing downward. Continue until the water runs clear and no foam or color remains.
Step 5: Squeeze out excess water and reshape
Use your fingers to gently squeeze out the extra water from base to tip. Then lightly press the brush on a clean towel and reshape the bristles into their original form.
Step 6: Lay brushes out to dry
Lay the brush flat on a towel with the bristles over the edge of a counter so air can circulate around them, or hang them with the brush heads angled downwards. Never leave brushes standing upright while wet, as water can seep into the ferrule.
Tips for Deep Cleaning and Maintenance
- For brushes with stubborn makeup residue, soak the bristles in a gentle cleaning solution for a few minutes before washing, then repeat the lather‑and‑rinse steps until the water runs clear.
- After cleaning, reshape the bristles and use a brush net to maintain their shape, especially for natural hair brushes, to prevent frizz.
- Spray the bristles lightly with medical‑grade alcohol for occasional disinfection, especially if the brushes are shared.
- For precious natural hair brushes, use a small amount of hair conditioner or brush conditioner to moisturize the bristles, preventing frizz, splitting, and shedding.
👉 For a full routine, see our deep cleaning makeup brush guide.
Quick Cleaning Between Clients or Busy Days
- Use a fast‑drying brush cleaner spray: spritz it onto a tissue, then gently swipe the bristles back and forth until no more color comes off.
- Use a dry sponge cleaner to quickly clean high‑use brushes like small face brushes, eyeshadow brushes, blending brushes, and brow brushes.
- Keep brush‑cleaning wipes on hand for quick surface cleaning when you do not have time for a full wash.
👉 Learn more in our quick daily brush cleaning tips for makeup artists.
Cleaning Makeup Brushes at Home with Household Products
If you don’t have a dedicated brush cleaner, you can still get excellent results using products you already own.
- Gentle face cleanser
A fragrance‑light, non‑stripping cleanser is perfect for everyday cleaning. It dissolves makeup and skin oils without drying out the bristles. - Mild shampoo
Great for natural‑hair brushes, which behave similarly to human hair. Use a small amount, work up a lather, then rinse thoroughly to avoid residue. - Dish soap + a drop of oil (optional)
For extremely caked‑on foundation or cream products, a drop of dish soap with a tiny amount of olive or baby oil can break down heavy buildup. Always follow with a thorough rinse and, if needed, a second wash with a milder cleanser.
Avoid harsh detergents, laundry powder, strong disinfectants, and undiluted alcohol; they can dry out or break down the bristles and adhesive.
👉 For a detailed comparison of cleansers, visit our article on what to clean makeup brushes with.
Special Care for Different Brush Types
Not all brushes should be treated exactly the same. Adjust your technique slightly depending on the bristles and shape.
- Natural‑hair brushes
Treat them like delicate hair: use lukewarm water and very gentle cleansers. Avoid strong degreasers and don’t scrub on rough mats. After washing, reshape carefully so the tips dry in a neat, tapered form. - Synthetic brushes
More resilient and better at handling cream and liquid products. You can use slightly stronger cleansers when needed, but still avoid extreme heat and aggressive scrubbing. - Dense face brushes (foundation, buffing, kabuki)
Product often gets trapped deep in the core. Spend extra time massaging the bristles and repeat the wash‑and‑rinse cycle until there is no discoloration in the lather. - Small eye and detail brushes
Use light, circular motions instead of pressing hard—tiny brushes lose their shape easily. If you often use dark or bright pigments, wash them more frequently to prevent staining. - Sponges and beauty blenders
Soak them thoroughly, then repeatedly squeeze cleanser and water through the sponge until the water runs clear. Always let them dry completely in a ventilated area before storing, because damp sponges can grow mold.
👉 Learn how to properly clean different makeup brushes, from foundation and powder brushes to eyeshadow and detail brushes, in our brush‑by‑brush cleaning guide.
How to Dry Makeup Brushes Safely
Proper drying is just as important as proper washing if you want your brushes to last.
Factors that affect drying time:
- Brush head size and density
- Bristle material (natural hair tends to dry more slowly than synthetic)
- Room temperature, humidity levels, and air circulation
In a normal, well‑ventilated room, most small and medium brushes dry within about 4–8 hours, while very dense face brushes may need overnight.
Best practices for drying
- Blot each brush on a clean towel after washing to remove as much water as possible.
- Lay brushes flat or slightly angled downward on a towel, with the heads hanging just off the edge of a counter for airflow.
- If you have a brush drying rack, hang them bristles‑down so water drains away from the ferrule.
Drying mistakes to avoid
- Standing brushes upright while wet – water can run into the ferrule, loosening the glue and causing shedding or rust.
- Using very hot air or putting brushes near heaters – high heat can warp bristles and damage adhesives.
- Leaving brushes to dry on a soaked towel – the underside stays damp and may lead to mildew or musty odors.
- Putting brushes in a clothes dryer or direct sunlight – both can shrink, frizz, or permanently deform bristles.
👉 If you want a full step‑by‑step routine, including different drying setups and tools, check our dedicated guide on how to dry makeup brushes properly.
Everyday Maintenance, Storage & When to Replace Brushes
Consistent light care between deep cleans keeps your brushes performing well and makes washing day much easier.
1. Spot‑clean between uses
After applying makeup, gently wipe bristles on a tissue or use a quick‑drying brush cleaner spray to remove surface pigment, especially on eye and lip brushes.
2. Store brushes correctly
Once completely dry, keep them upright in a cup, brush holder, or closed case that still allows airflow. Avoid sealing damp brushes in airtight containers or storing them in very humid bathrooms.
3. Travel smart
Use a brush roll or protective caps to avoid bent or frayed bristles in your makeup bag. When you get home, unpack and air out your brushes, and wash them as soon as you can.
4. Know when it’s time to say goodbye
Replace brushes that continue to shed heavily, feel scratchy on the skin, won’t hold their shape anymore, or still smell or look dirty even after a thorough cleanse.
Frequently Asked Questions
— Can I clean brushes using only water?
Plain water won’t dissolve oils and long‑wear makeup, so it can’t properly sanitize your brushes. You always need some type of cleanser to break down residue.
— Is it safe to use rubbing alcohol on my brushes?
Occasional light spritzing on synthetic bristles is fine for quick disinfection, but frequent soaking or use on natural hair can dry and damage the fibers. Reserve alcohol for rare spot treatments and rely on gentle cleansers for routine washing.
— Can I wash my makeup brushes and sponges together?
Yes, as long as each tool gets enough attention. It’s usually easier to wash brushes first, then focus on soaking and squeezing your sponges separately so you can see when the water runs clear.
— What if I don’t have a brush drying rack?
Fold a towel, place it on the edge of a counter, and lay brushes so the handles rest on the counter and the bristles hang off the edge. You can also secure handles to a clothes hanger with elastic bands and hang them bristles‑down.